Authorization with Azure API Management
In integration scenarios where authorization constraints are required for the API protected assets, an authorization solution will be needed to enforce the necessary, fine-grained access control.
In this article, I will conduct a walk-through for applying OAuth 2.0 using Azure API management (APIM) and Azure Active Directory (AAD) which provides an authorization solution for an underlying, public Weather API.
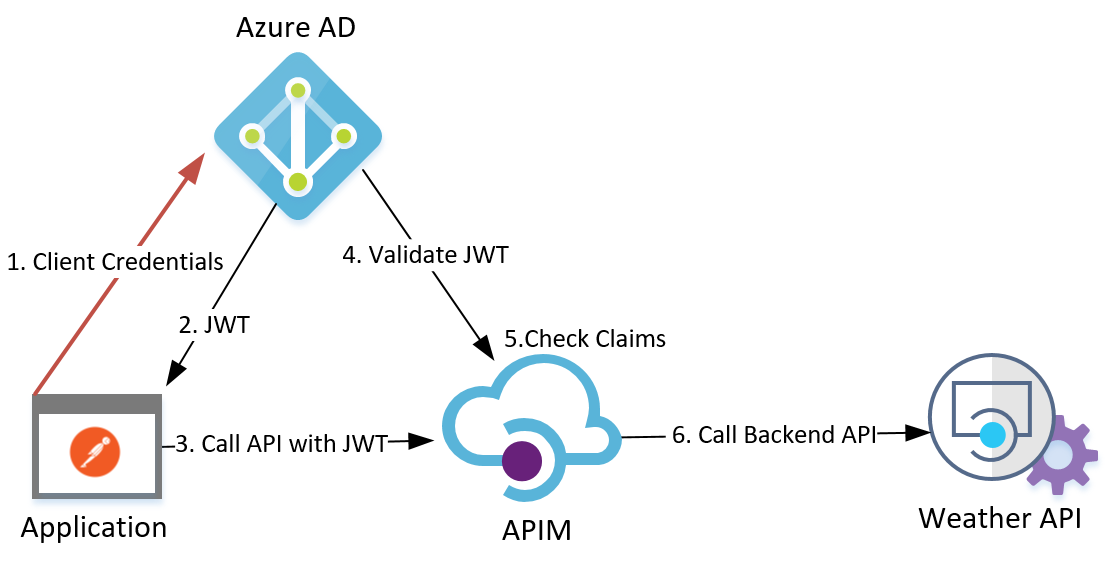
In OAuth 2.0 terms, AAD is the (Authorization Server) which contains the integrated objects’ information and access control permissions, the APIM is the (Resource Server) that will actually govern access to the underlying Weather API (API Resource).
I will be integrating an application represented by Postman (Client) with the Weather API (API Resource) through Azure APIM using OAuth 2.0 client credentials grant type. This grant type is dedicated for server-to-server integrations which does not require end-user interactions for consent.
1. Register the Client and the API Resource in AAD
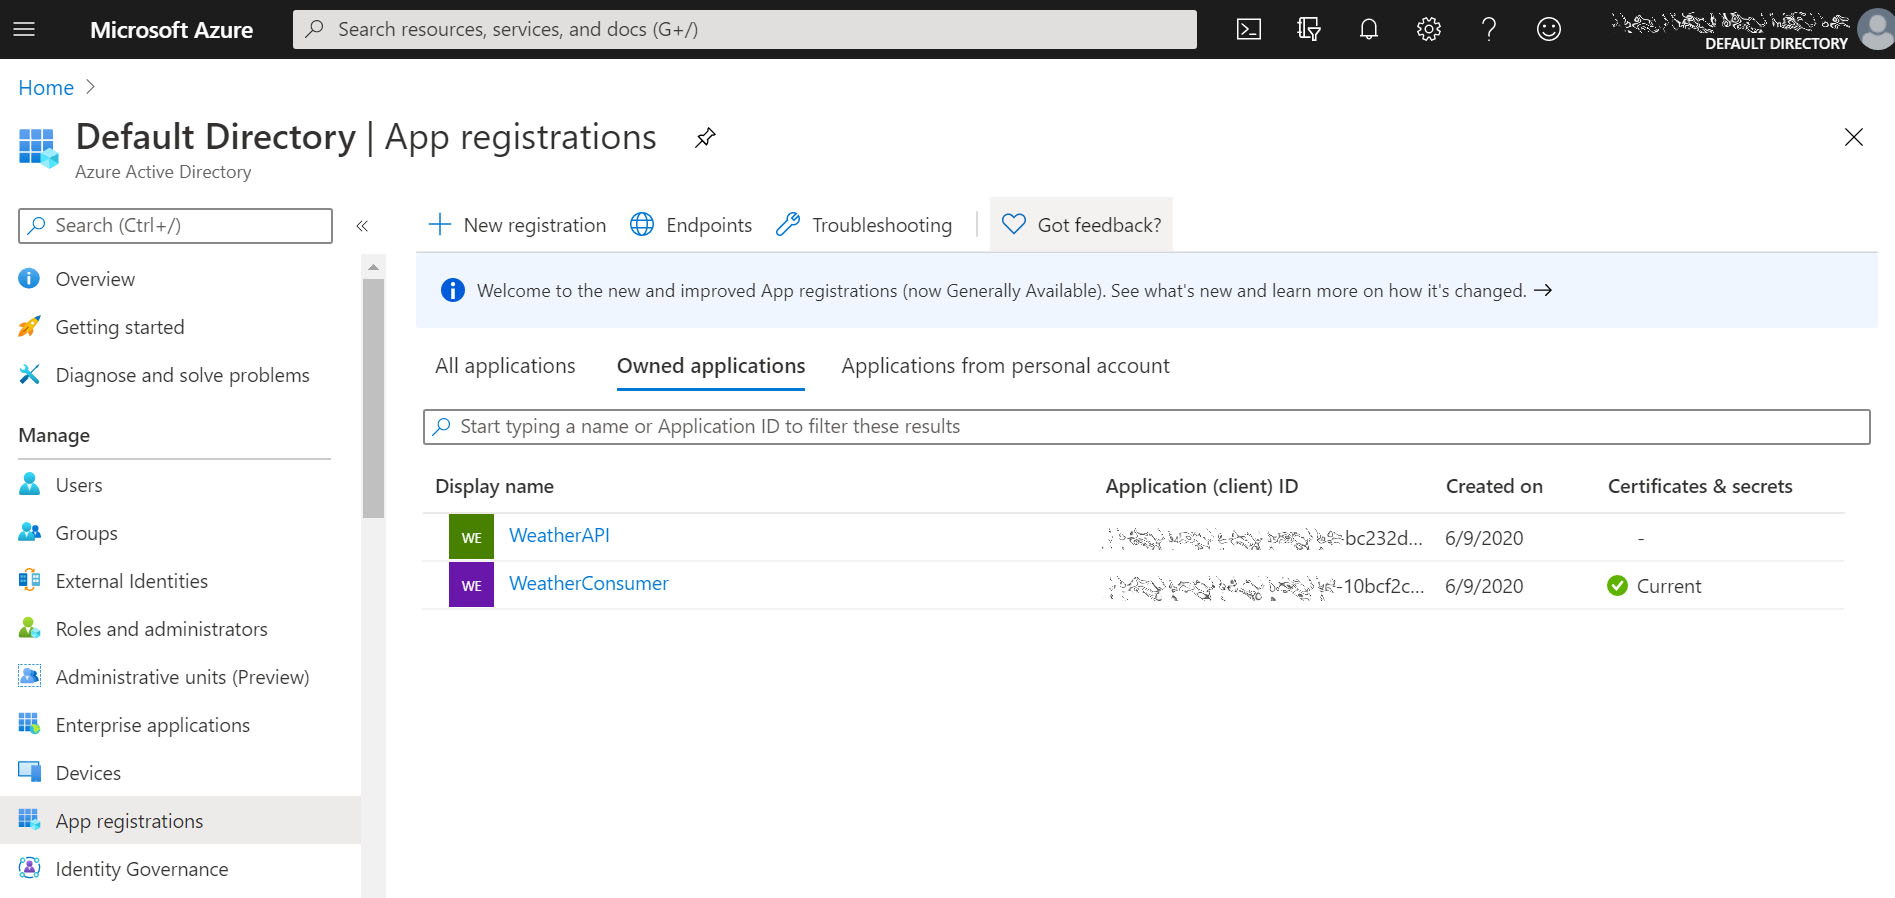
First, we need to represent both the client and the API resource by registering them as application objects (security principals) in AAD > [App registrations].
This is the way AAD (Authorization Server) will have the needed information about these objects to issue access tokens with the defined permissions to clients in the form of claims, which will be presented by the client through its API requests to the APIM to be validated before granting access to the underlying API resource.
In this example, the two applications were conveniently named: WeatherConsumer and WeatherAPI.
Notice in the below screenshot during WeatherAPI app registration, I left the default option for [Supported account type] field: Accounts in this organizational directory only, as both objects will be registered within my organization’s AAD home tenant.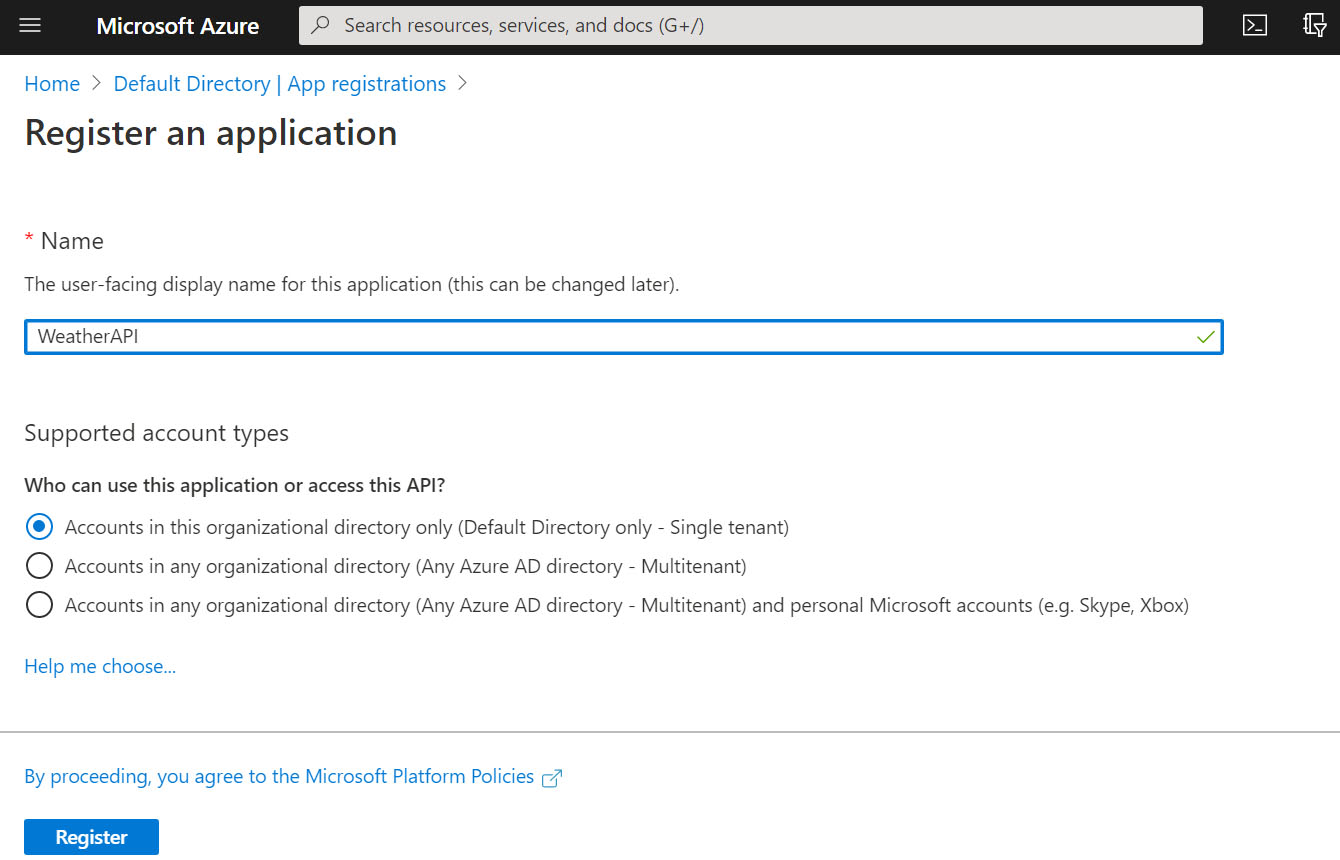
2. Configure the AAD Applications
Next, we will do permissions-related configurations for the newly created AAD applications.
Azure AD Version 1.0 endpoint or Version 2.0 endpoint?
AAD has authentication endpoints that fulfill the authorization server role in authentication and authorization schemes, for example in issuing access tokens to clients and in validating tokens to resource servers. Currently there are two fully supported Azure AD endpoint versions: AAD platform version 1.0 endpoint and the new Microsoft identity platform version 2.0 endpoint.
In a nutshell, Microsoft identity platform is an evolution of the older AAD platform version 1.0 endpoint, and it is currently still evolving and it is not yet in full parity with version 1.0 features.
However, version 2.0 aligns more closely with OAuth 2.0 specification and it also includes additional features such as B2C social accounts support, incremental consent feature, scope-based authorization, just to name a few. It is no wonder why Microsoft recommends the use of the new version 2.0 endpoint in the documentations.
Generally, if you will be using OIDC or OAuth protocols, require any of the newly supported features and if you are totally aware of the current limitations in version 2.0 endpoint, then you should use it. I advise you to review the detailed information in this documentation before deciding which platform version would be more suitable according to the aforementioned factors.
In this walk-through, I am going to use the new Microsoft identity platform version 2.0 endpoint. Version 1.0 endpoint could also be leveraged with some minor changes. I included an extra section at the end of the article to highlight the required changes when using version 1.0 endpoint.
2.1 Set Access Token Version in API Resource AAD Application
In the WeatherAPI Application Manifest editor, we will need to change the value [accessTokenAcceptedVersion] field from null (which defaults to: 1) to 2.
Application Manifest?
The application manifest is just another way to directly view and change all the AAD application object attributes, while it is the only way to change some attributes that are not available through the Azure portal UI settings; at the time of this writing [accesstokenAcceptedVersion] and [appRoles] were among these attributes.

This step is required as I am using the new version 2.0 endpoint and it needs to be applied only on the API resource application, as this is what actually dictates which JWT version and format will be issued by AAD to clients.

Interestingly, the AAD token endpoint version used by the client is actually irrelevant, clients will still get the JWT access token version 2.0 even from AAD token endpoint version 1.0!
For consistency and to avoid confusion and potential unpredictable issues now or in the future, it is best to use the same version for all the endpoints.
UPDATE: November 2020
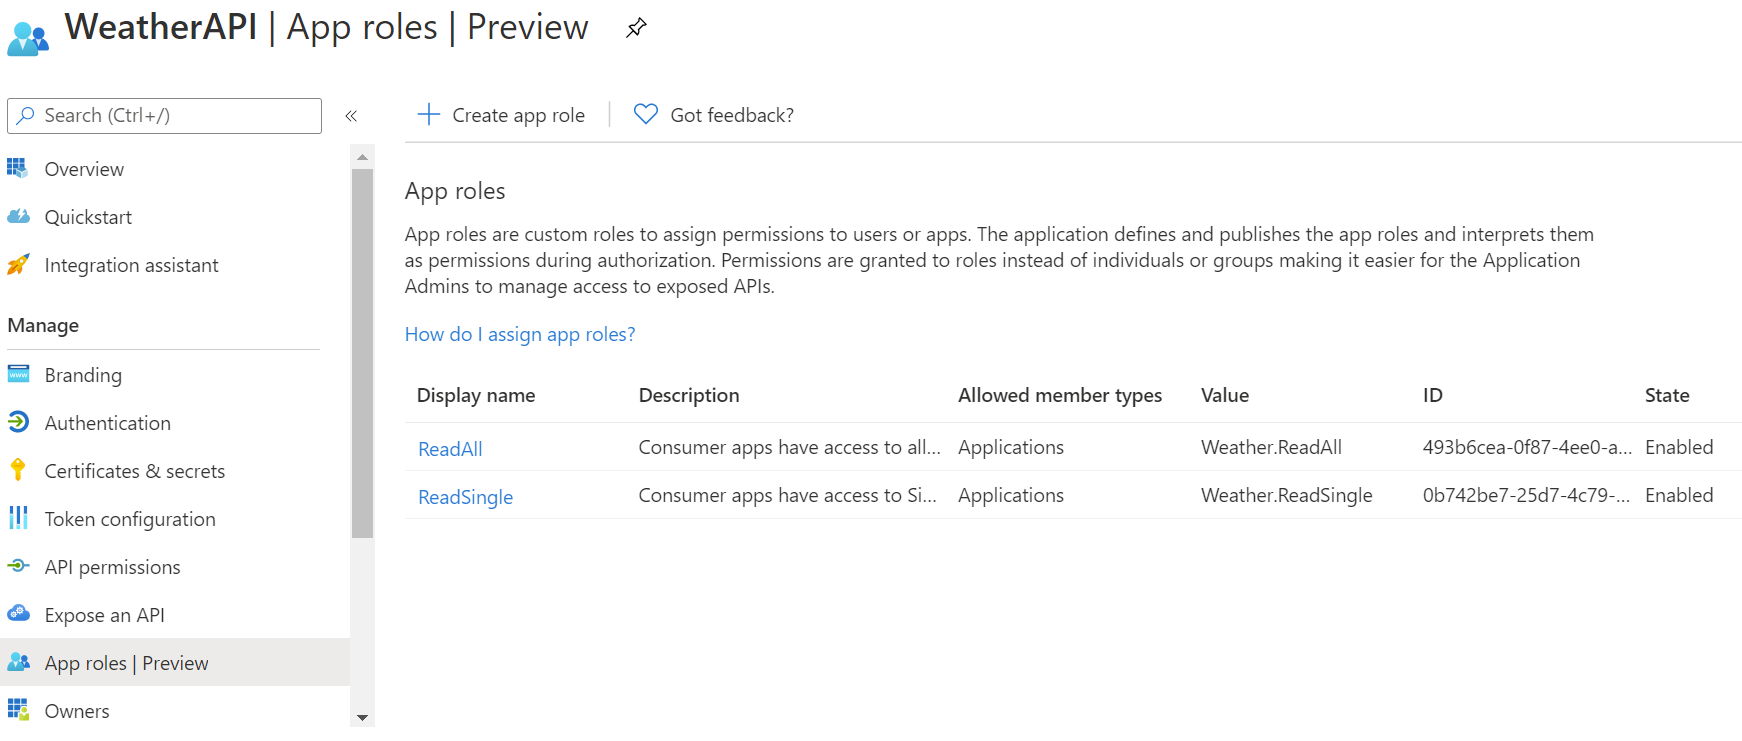
[appRoles] Azure AD application attribute is now available (in preview) in the portal UI, so alternatively you could change and view the application roles through Azure portal UI settings.
2.2 Expose the API Application
This step is required to explicitly expose the API resource and the underlying roles and make them available for client applications through the authorization request to AAD, without this step the resource will not be available to the clients.
In the API resource AAD application > [Expose an API] > [Application ID URI], click on (set) link, an identifier URI for the application will be generated, click save.

2.3 Set the Client Secret in Client AAD Application
Next, we need to set the client secret which will be shared with the client application developers along with the client ID. AAD will authenticate client applications using these credentials before issuing the JWT.
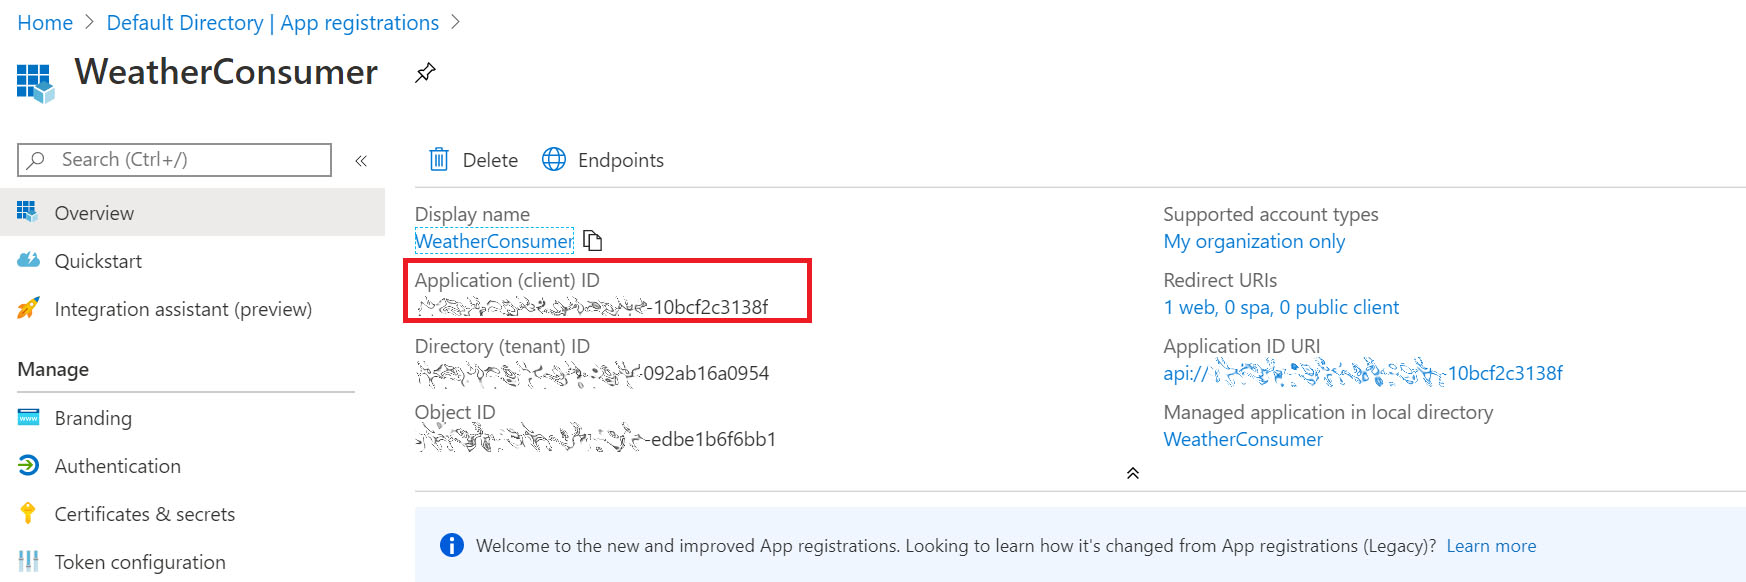
The client ID is the unique identifier generated for the application object in AAD.
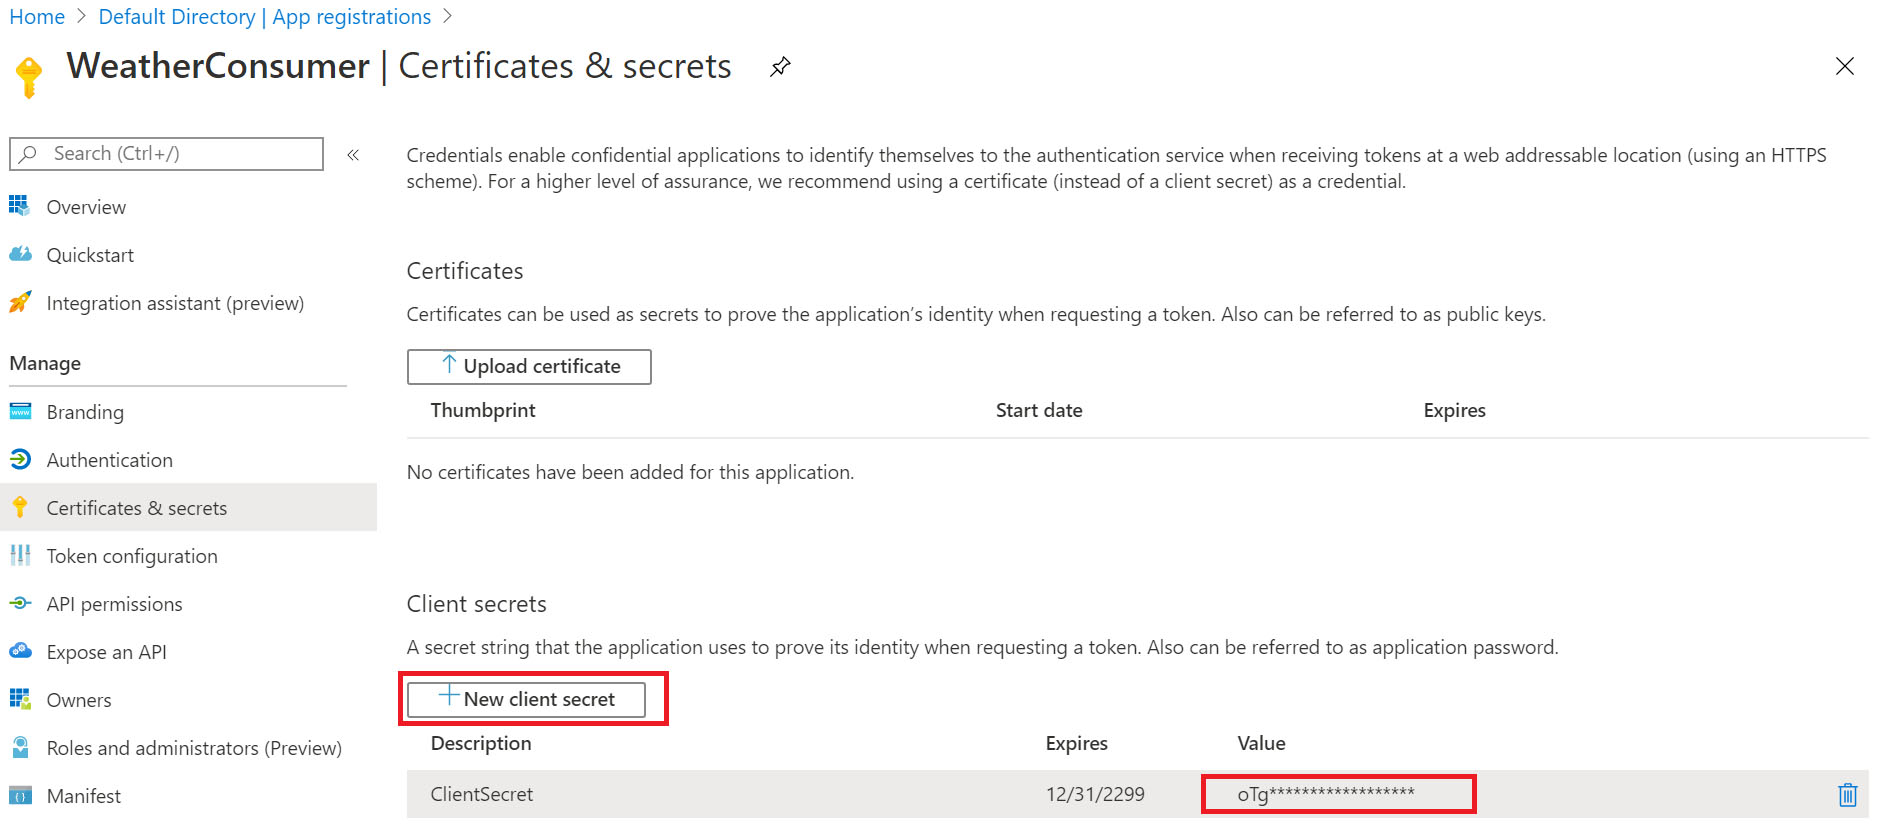
To create the client secret, in the Client AAD application > [Certificates & secrets] > [New client secret], copy the secret once it is generated as you won’t be able to view it again after you leave this page.
2.4 Define Application Roles for the API Application
Here we will define the application roles available in the target API resource, this will be the set of roles from which selected permissions will be granted to client applications according to the level of access control required for each.
In my example, the APIM publishes two operations, one that retrieves basic weather data for a static city, and the other operation retrieves advanced weather data for any city that is passed in the URL template parameter.
So, I created two roles in the [appRoles] field: Weather.ReadSingle, and Weather.ReadAll in the WeatherAPI Application Manifest editor, one role for each APIM operation I have.
The role ids are just unique identifiers that you generate, and since it targets server-to-server interaction, the [allowedMemberTypes] field should be set to Application, as shown below.

"appRoles": [
        {
            "allowedMemberTypes": [
                "Application"
            ],
            "description": "Consumer apps have access to all Weather Data.",
            "displayName": "ReadAll",
            "id": "493b6cea-0f87-4ee0-a6c1-3b2df15e3a1d",
            "isEnabled": true,
            "lang": null,
            "origin": "Application",
            "value": "Weather.ReadAll"
        },
        {
            "allowedMemberTypes": [
                "Application"
            ],
            "description": "Consumer apps have access to Single Weather Data.",
            "displayName": "ReadSingle",
            "id": "0b742be7-25d7-4c79-bc77-d028c473b8d9",
            "isEnabled": true,
            "lang": null,
            "origin": "Application",
            "value": "Weather.ReadSingle"
        }
    ]
2.5 Grant the Client Application the needed permissions
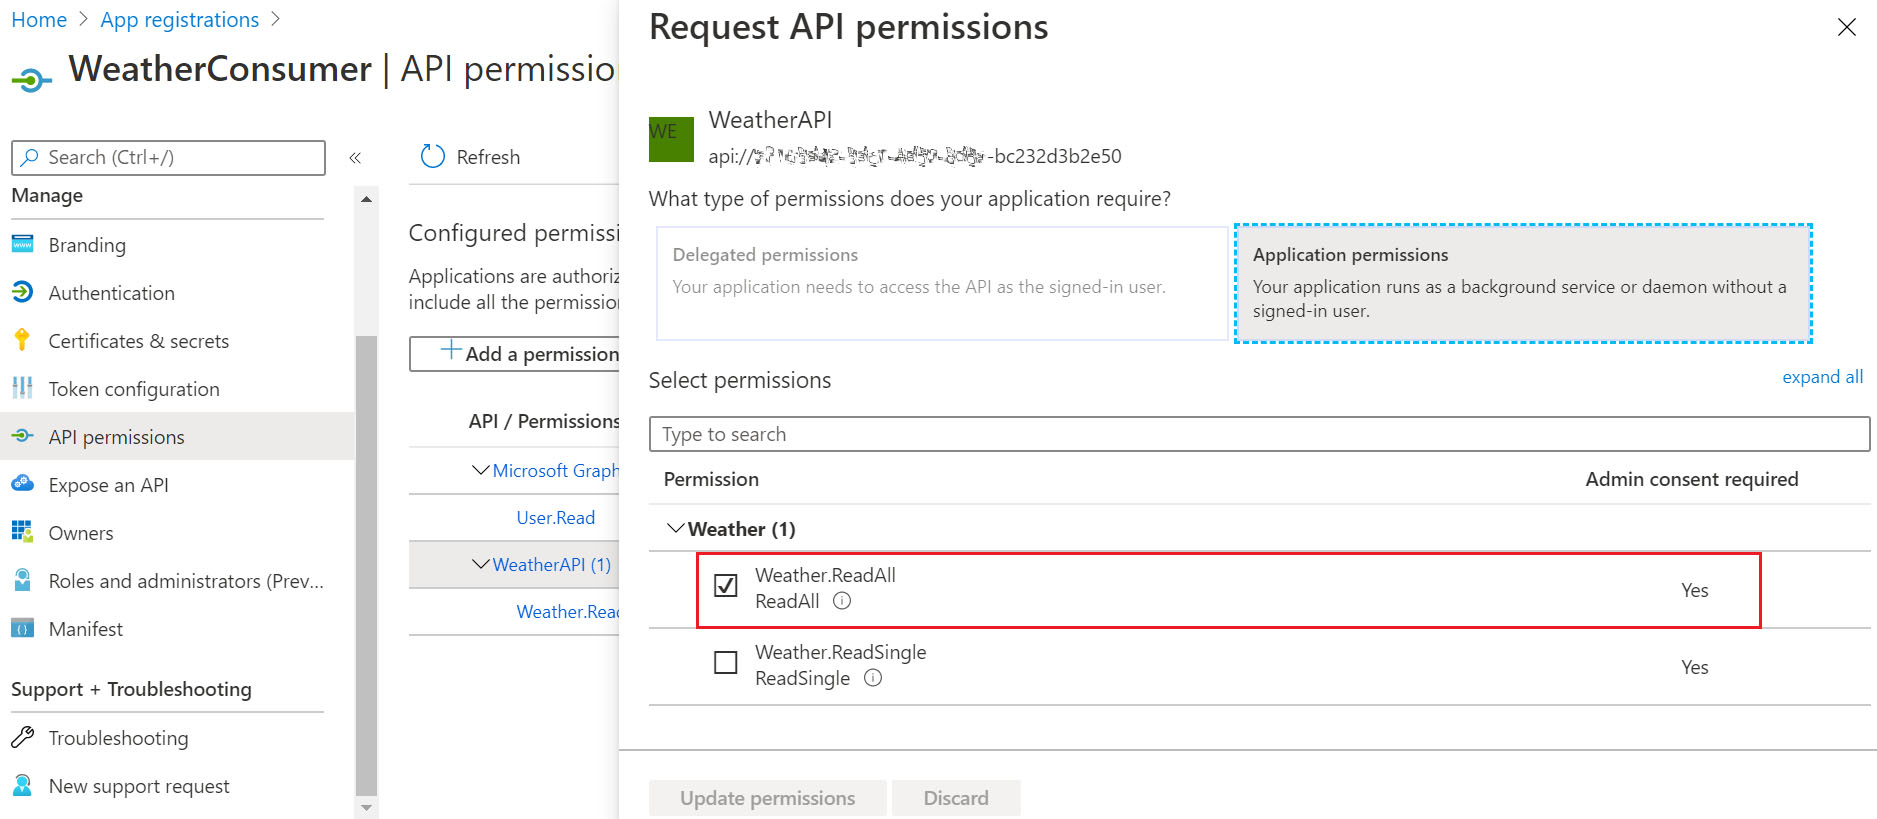
This is the step where we map the required roles to be granted to the client application from the set of application roles previously defined for the target API resource.
Since application permissions in AAD require admin consent, so we will need to grant admin consent for those permissions, before it can take effect and accordingly reflect in JWT claims. You need to be a user having one of these roles: global administrator, application administrator, or cloud application administrator.
Alternatively, you will need to send a request for an admin review and approval for these permissions, provided that Admin consent workflow is configured in AAD > [Enterprise applications] > [User Settings].
2.6 AAD issued JWT Quick Test
Let’s do a quick test to make sure everything is working fine so far. We’ll call the AAD token endpoint with the client ID & secret and inspect the returned JWT payload.
The AAD version 2.0 token endpoint will be in the following format: https://login.microsoftonline.com /{tenantID}/oauth2/v2.0/token
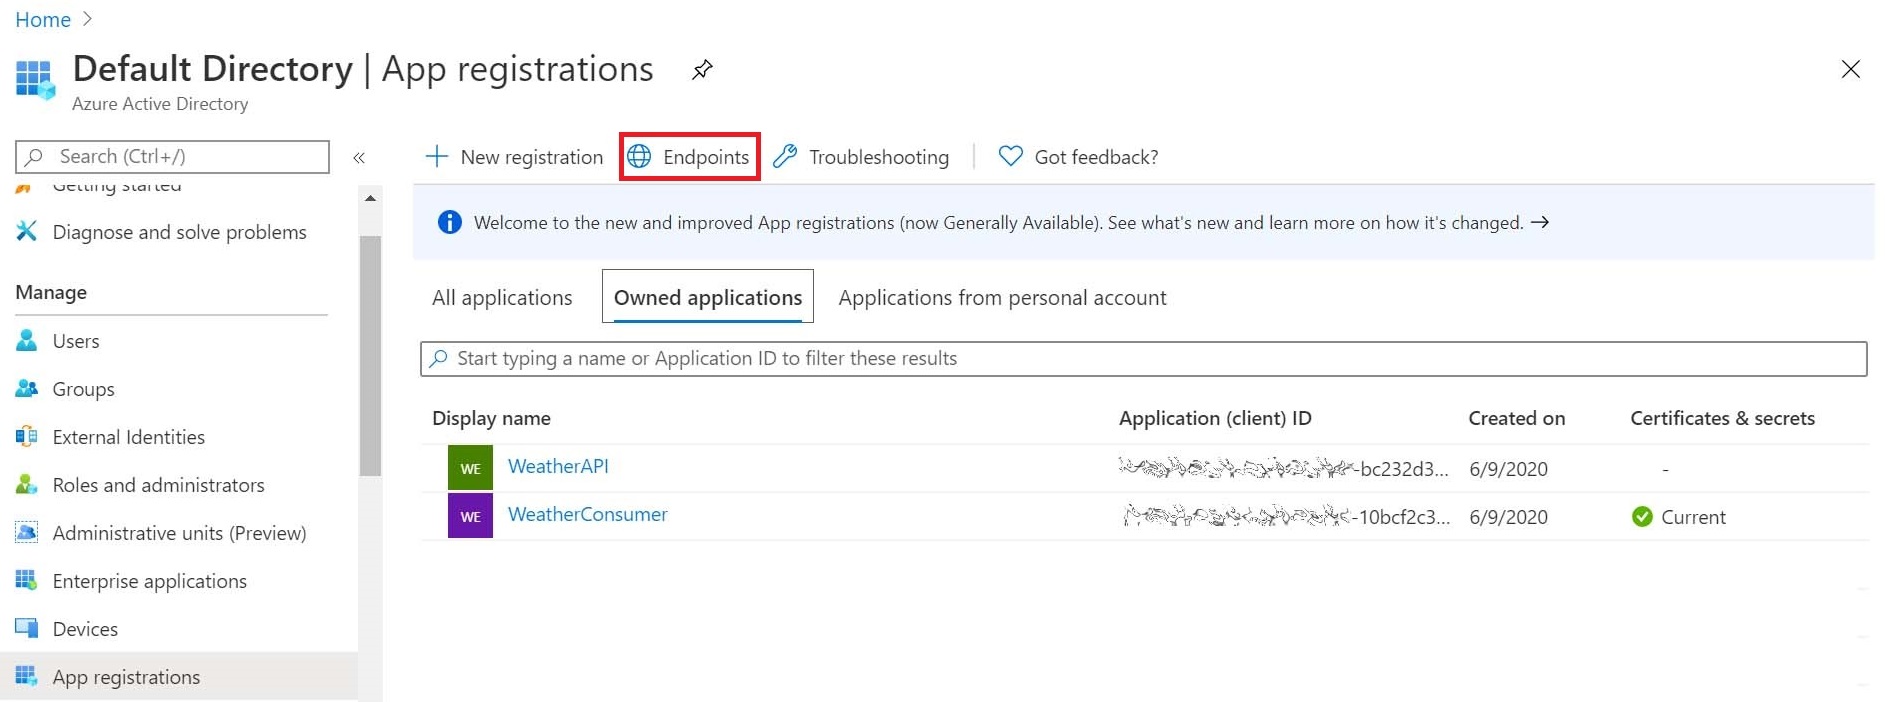
You can discover your AAD tenant endpoints for the two versions through Azure Portal: AAD > [App registrations] > Endpoints.
Scope, Role Claims ?
It is worth mentioning that the “scope” concept is sometimes confused with the role claims in AAD.
New developers usually get confused because they either mistake the scope for the role claims and try to send it in the authorization request, or they know that the scope parameter is optional for this grant type in the OAuth 2.0 specification, while the AAD requires it and they don’t know what value to pass.
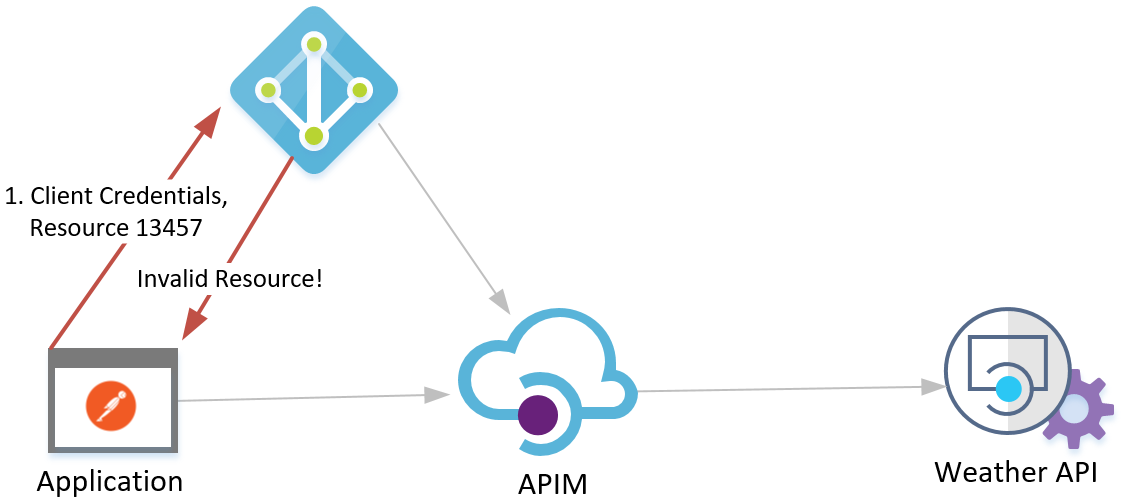
Using AAD version 2.0, when we send the authorization request for application permissions using the client credentials grant type, we must set the [scope] with the target API resource identifier suffixed with /.default scope. This format is aligned with the newly introduced scope-based authorization concept in AAD version 2.0.
It is important to note that this static, built-in scope (/.default) is mandatory in client credentials grant type in AAD version 2.0; it is used to retrieve from AAD the set of application permissions defined in the resource app registration information.
Therefore, in our case, the [scope] value will always be in the following format: api://{applicationID}/.default

After inspecting the decoded JWT, we should see the returned [role claims] as defined in the AAD application permissions for the selected client application, as shown below. It might take a couple of seconds for the newly applied permissions to take effect and reflect in the issued token.
We can also see that [aud] claim will actually be set according to the selected resource in [scope] parameter passed by the client in the authorization request.
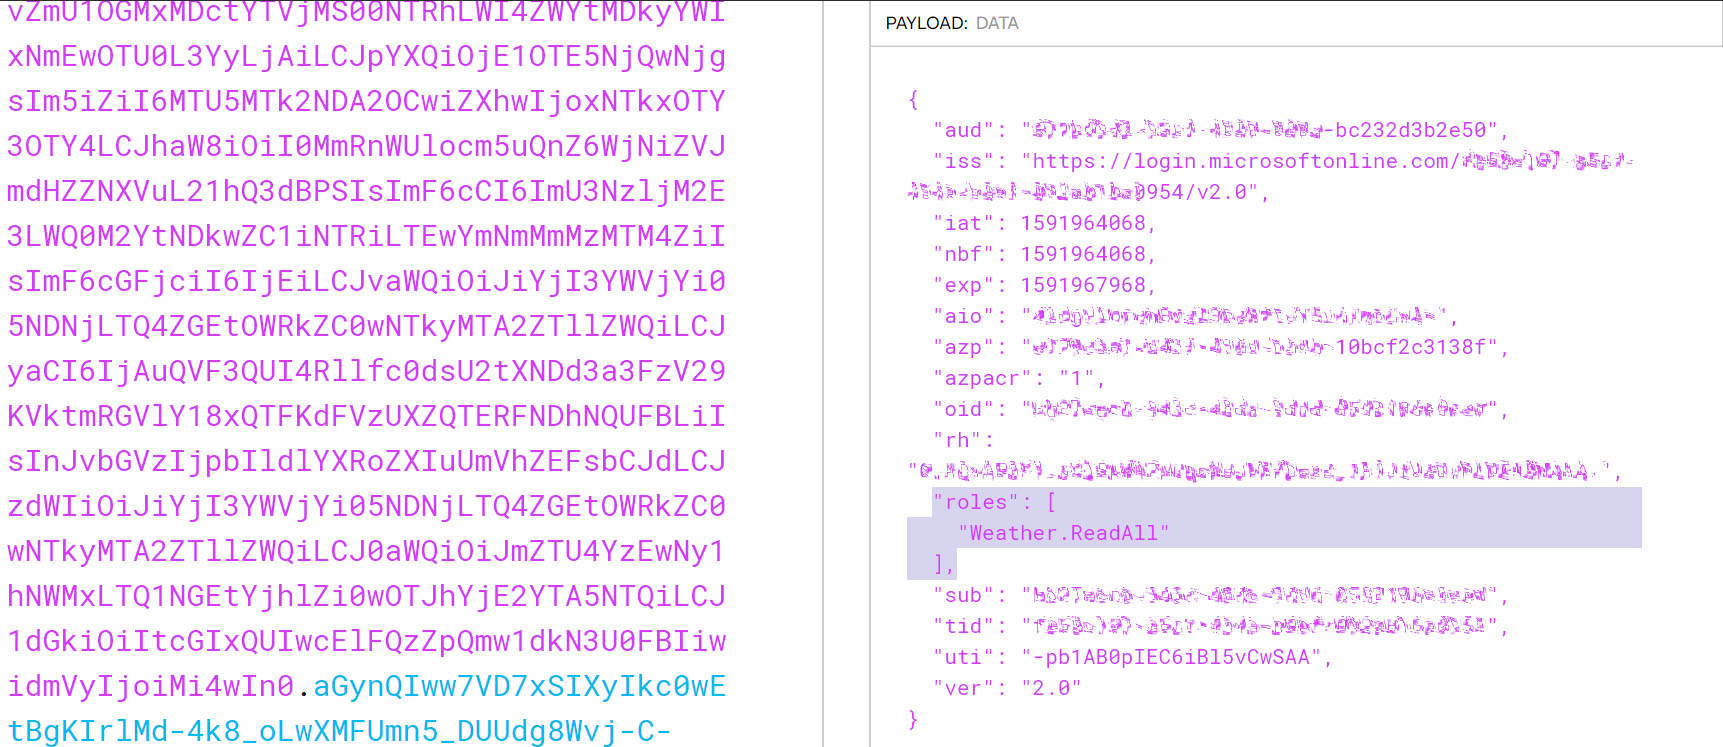
It is important to mention that AAD Application Permissions allow a broad access to tenant-wide resources, so authenticated clients requesting authorization for any available resource in the same tenant will still receive a valid JWT with [aud] claim value of that respective resource.
This means we can’t rely on [aud] claim when enforcing access control; instead we will rely on the role claims issued by AAD according to the explicitly granted application permissions to clients.
3. Configuring APIM Instance
As mentioned earlier, Azure API Management is used here as the Resource Server which will enforce the role-based access control over the backend API using policy configurations.
3.1 Apply the Operation-Level Access Restriction Policy
We start by applying the JWT validation policy on the operation-level, which will validate the JWT and will also inspect the role claims in the incoming request against the required role claims defined in the policy, before authorizing the API call.
Select the target API operation in APIM and apply the JWT validation policy in the inbound policy section, as shown below.

The URL attribute in the [openid-config] element sets the full URL for your AAD metadata endpoint, this endpoint provides a JSON document containing metadata information like AAD endpoint URLs, supported features, signing keys and issuer information, among other information.
This endpoint URL is available in Azure Portal in AAD > [App registrations] > Endpoints, and it will be in the following format: https://login.microsoftonline.com /{tenantID}/v2.0/.well-known/openid-configuration
In the [required-claims] element, I set the exact role claim to be checked against the incoming JWT payload [roles] section, and this is what will actually enforce the role-based access control over the selected API operation. It is worth mentioning that [claim] element has an optional attribute [match] where it can validate (all) claims or (any) matched claim.
<validate-jwt header-name="Authorization" failed-validation-httpcode="401" failed-validation-error-message="Unauthorized API Call">
 <openid-config url="https://login.microsoftonline.com/{TenantID}/v2.0/.well-known/openid-configuration" />
  <audiences>
    <audience>{WeatherAPIApplicationID}</audience>
  </audiences>
  <required-claims>
   <claim name="roles">
     <value>Weather.ReadAll</value>
   </claim>
 </required-claims>
</validate-jwt>
3.2 Test the entire flow
To test the whole flow, first send an authorization request to AAD token endpoint as previously shown to retrieve the JWT using the client credentials.
Then, pass the JWT in the [Authorization] header in another request to the APIM published API operation.
If the client doesn’t have the proper claims for this specific APIM operation, you will get the 401 response status along with the message, as defined in the APIM JWT validation policy configuration.
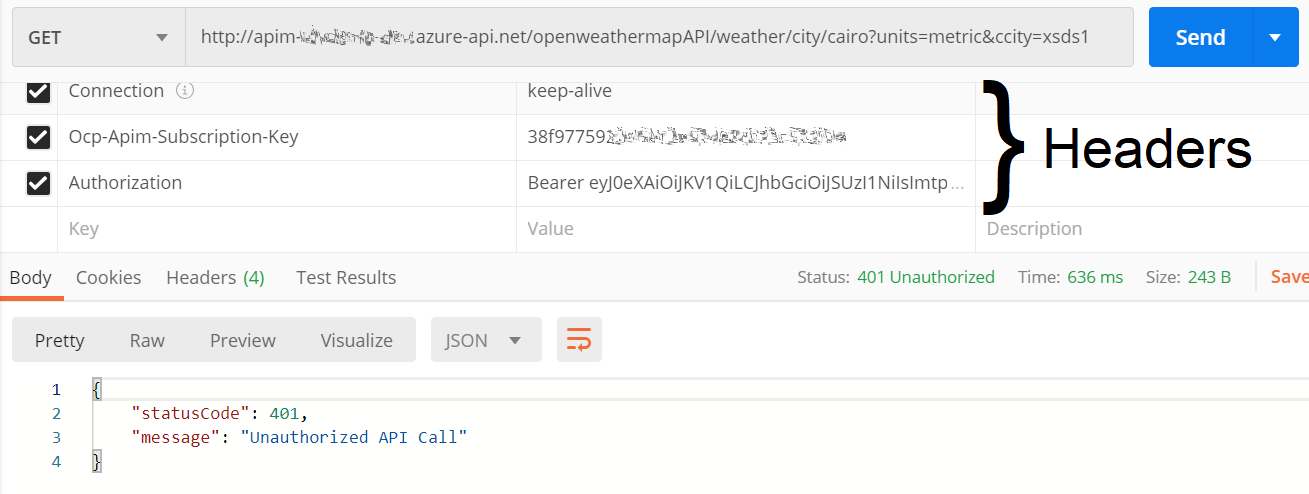
If the client is authorized, by having the correct role claims, you will get 200 response along with the expected response payload.

In my case the JSON response payload was transformed to a SOAP envelope in APIM outbound transformation policy using a liquid template, and here is contains the current temperature in Celsius for Cairo, Egypt on a hot summer day.
At this point, the authorization solution is complete with fine-grained access control applied on the API operation-level using OAuth 2.0.
3.3 APIM Developer Portal OAuth 2.0 settings
This last step only affects the developer portal experience, it will allow developers to test OAuth 2.0 APIs in the APIM developer portal interactive console by retrieving the access token on their behalf. At the time of writing this article, the new developer portal doesn’t support this feature yet.
First, we should register a new client application in AAD that represents the developer console and grant it the required API permissions.
Next, in APIM instance > [Developer Portal > [OAuth 2.0], add a new service, hopefully with a more relevant name than the one I chose here.
We need to set the following fields, and leave the default ones for the rest. Note that some fields are irrelevant for our grant type, however these are mandatory in this blade and need to be filled anyway.
- Client registration page URL: http://localhost (just a placeholder)
- Authorization grant types: Client credentials
- Authorization endpoint URL: https://login.microsoftonline.com /{tenantID}/oauth2/v2.0/authorize
- Token endpoint URL: https://login.microsoftonline.com /{tenantID}/oauth2/v2.0/token
- Default scope: api://{APIResourceApplicationID}/.default
- Client ID: {DevConsoleApplicationID}
- Client secret: {DevConsoleApplicationSecret}
Finally, we will need to set the Security settings on the API-level and set the [User authorization]: OAuth 2.0 and set the [OAuth 2.0 server] to the authorization service we just created, as shown below.

Now, API developers can test the protected APIs by simply selecting the pre-configured authorization service in the developer portal and it will automatically retrieve the JWT and include it in the API request to be tested, as shown below.

4. OAuth 2.0 using AAD Version 1.0 (Alternative Path)
In this extra section, I will highlight the changes required in the previous steps in order to use AAD version 1.0 endpoint instead of Microsoft identity platform version 2.0 endpoint. Any unmentioned instructions in this section should be the same as before. We will also take a quick look into the differences between the two generated JWT versions.
4.1 AAD Applications Settings
In the Resource API Application Manifest, leave the default value unchanged for [accessTokenAcceptedVersion] as null (which defaults to: 1).
4.2 APIM Instance Settings
We will use AAD version 1.0 endpoints instead, for the previous steps. Look for the corresponding (v1) endpoints in Azure Portal in AAD > [App registrations] > Endpoints.
Specifically, the APIM instance JWT validation policy configuration (OpenID Connect metadata document), and the developer portal OAuth 2.0 service settings (Token endpoint URL, Authorization endpoint URL), which will be in the following formats.
- OpenID Connect metadata document: https://login.microsoftonline.com /{tenantID}/.well-known/openid-configuration
- Token endpoint URL: https://login.microsoftonline.com /{tenantID}/oauth2/token
- Authorization endpoint URL: https://login.microsoftonline.com /{tenantID}/oauth2/authorize

In APIM instance > [Developer Portal > [OAuth 2.0], you don’t need to fill in the [Default scope], you will need to add the [resource] parameter with the target resource ID in the following format: api://{applicationID}

4.3 Client Authorization Request
The client application should send the authorization request to version 1.0 token endpoint and use the [resource] parameter instead of the [scope] parameter.
The [resource] parameter value should include the target resource ID in the following format: api://{applicationID}, which aligns with version 1.0 resource-based authorization concept. This is functionally equivalent to the default scope used in version 2.0 scenario.

If we compare the two JWT versions, we can see some of the changes that occurred in version 2.0 JWT payload. Some claims’ names changed such as [appid, appidacr] to [azp, azpacr] respectively, aligning with OAuth 2.0 specification.
We can also see that some of the other claims’ values have changed between the two versions such as the audience format, and obviously the issuer URL and the token version.

Acknowledgments
I was inspired to write about this topic after attending Mattias Lögdberg‘s Integrate 2020 online session: “Improve your API’s with RBAC security” – using Auth0 as the authorization server.
Special thanks and gratitude to Mikael Sand for thoroughly reviewing my article and providing me with his valuable feedback, corrections, and enhancements which motivated me to expand a little more in some sections, and improved the quality of the article.
One of the most comprehensive article for authorization on APIM